
(Image source: Stormgain.com). Cardano is a blockchain cryptocurrency, its native token being ADA. In this article we take a practical, step-by-step look at how we can set up nodes on the blockchain, often called a stake pool to earn ADA rewards.
Unlike other blockchains there is no mining as such on Cardano, instead we have staking. The concept behind a stake pool on Cardano is relatively straightforward, users delegate their ADA to stake pool operators who in turn receive rewards for running the nodes and verifying transactions. The unique thing about Cardano is that users do not need to send or lock up their ADA to node operators. Their ADA remains in their wallets and can be spent at any time.
Rewards are sent automatically by the network and the system offers a unique opportunity for both users and stake pool operators to help in strengthening the network via decentralisation and in return receive passive income.
This article is designed for beginners but you should have some basic knowledge of Ubuntu/Linux and some of the commands in order to manoeuvre the process. Setting up a stake pool is not difficult but there are many steps that need to be followed precisely to avoid running into trouble.
You will also need to find a hosting provider to run the nodes on (options provided at the end of this article), minimum requirements that worked for me are as follows:
You will need 3 separate servers:
Cloud VPS 16GB running Ubuntu (20.04 64 bit) with 100GB storage and 4 core or higher CPU.
Anything less than 16GB did not work for me.
You will also need a fresh basic laptop that has not been connected to the internet. We will use this as an ‘air-gapped’ machine to verify transactions and to sign certificates to launch your stake pool.
Also, I used a Windows laptop to connect to the virtual servers and launch the stake pool but Mac should work if you download the appropriate software for your machine.
So here goes…
Initial setup
You will need to download the Ubuntu terminal on your laptop so you can access the virtual servers.
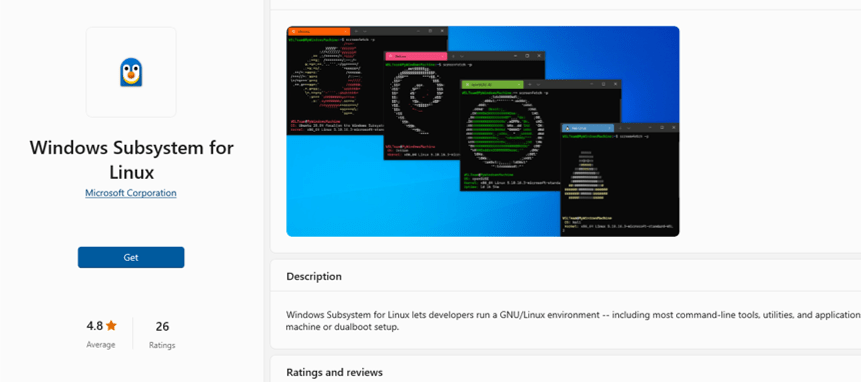
Download WSL(Windows Subsystem for Linux) for Windows from the Microsoft store
Download Ubuntu Terminal 20.04 from the Microsoft store
Once you have installed both, log into your Ubuntu terminal. It will look something like this:
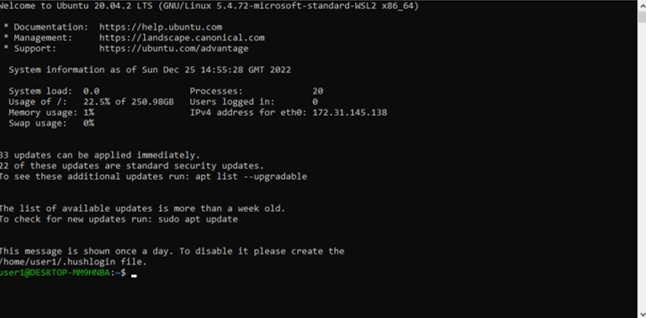
We will use this terminal to connect to your virtual servers and issue commands to launch your Cardano nodes and stake pool.
Create ssh key in ubuntu terminal enter the following:
ssh-keygen -t rsa -b 4096
Generating public/private rsa key pair.
Enter file in which to save the key (/home/user1/.ssh/id_rsa): /home/user1/.ssh/yourfilename-ssh
Enter passphrase (empty for no passphrase):******
cat /home/user1/.ssh/yourfilename-ssh.pub
You should see the keys randomart image – it will look something like this:
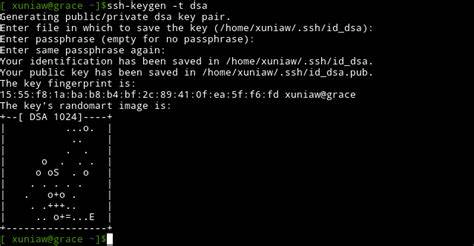
cat /home/user1/.ssh/yourfilename-ssh
will print your ssh key
Setting up the Virtual Servers
When you get a hosting provider you will be given the ip addresses of your server.
Keep one as your block producer ip (do not make this ip public)
Write down your relay1 ip >> xx.xxx.xx.001
Write down your relay2 ip>> xx.xxx.xx.002
Write down your production ip>> xx.xxx.xxx.003
**Remember your Production relay IP is Private!***
Access your 3 Virtual Servers from the Ubuntu Terminal in 3 separate windows using the following commands:
ssh -i ~/.ssh/<youruser> root@xxx.xxx.xxx.001
ssh -i ~/.ssh/<youruser> root@xx.xxx.xxx.002
Production node (this ip is private do not share):
ssh -i ~/.ssh/<youruser> root@xxx.xxx.xxx.003
If all is good you should be asked for your passphrase
And have the following prompt:
>>root@relay1:~#
And
>>root@relay2:~#
And>>root@production:~#
sudo passwd root – to change password if necessary
sudo hostnamectl set-hostname relay1 – to change the hostname to relay1,relay2, production etc if necessary
On each Virtual Server add a new user
>> adduser <youruser>
Type in a new password: *******
<Enter> for remaining questions
>>sudo gpasswd -a <youruser> sudo
If all is good you should get the message
Adding user <youruser> to group sudo
On your Ubuntu terminal next print out your ssh key
>>sudo cat ~/.ssh/yourfilename-ssh
Copy the printed ssh string – should look something like this:
ssh-rsa AAAAB3NzaC1yc2EAAAADAQABAAACAQCfRhveDyqSsSiOeFRoFSPSmvpX7OVtGCGQrh6EsaIrhox2W55ZWDt1ikDEOGIH0VyoApqb9WddX1iFjdFzJnLJZKa3cB89X/mt4HD7IPLxrYBClcXdXJYBpS+JNB3vlrxAN/YgVMD37LIvOaeUOjQftghPRMa3VPC+5dlnN4zXzPM8BzJWI7bdQMEkrx0bnhR//p/HoNiTpQMzTHbyEgI9WLwP5seUSYwmXXlVrguRzSjEfe/ROFaRQyszSGdsBcnBq2huisBdGW+5AP4TbDTREM+eWrW4ETvujdDDcW2Lr/tZpQQyM5r3eOR…….
Back on your virtual terminals
Switch user to your new user
>>su <youruser>
Make a directory for ssh
>>mkdir -p ~/.ssh
Create blank file
>>sudo touch ~/.ssh/authorized_keys
Enter a password>>******
Edit file
>>sudo nano ~/.ssh/authorized_keys
Paste the ssh string in the editor
Do a Cntrl X to exit
Select (Y)es
Then <Enter>
We now need to change permissions
>>sudo chmod 700 ~/.ssh
>> sudo chmod 600 ~/.ssh/authorized_keys
>>sudo chown -R <youruser>:<youruser> ~/.ssh
Open a new terminal window
Test logging in to the newly created user on each Virtual Machine
ssh -i ~/.ssh/<youruser> <youruser>@xx.xxx.xx.xx1
if successful you will be prompted
<youruser>@relay1:~$
type exit
and test relay2
ssh -i ~/.ssh/<youruser> <youruser>@xx.xxx.xx.xx2
you should get the relay2 prompt
<youruser>@relay2:~$
Exit and test the production Node
ssh -i ~/.ssh/<youruser> <youruser>@xx.xxx.xx.xx3
you should get the production prompt
<youruser>@production:~$
Back to Virtual Terminal windows – next disable root login
>>sudo nano /etc/ssh/sshd_config
Edit the file – scroll down to #Port 22
Change this to Port 22xx (random port for example 2222) (delete the #)
Scroll down to PermitRootLogin yes
And change to no
Do a Cntrl X
And Y
<Enter>
>>sudo systemctl restart ssh
or
sudo systemctl restart sshd
In a new terminal window check you can login still
>>ssh -i ~/.ssh/<youruser> <youruser>@xx.xxx.xx.001 -p 2222
>>ssh -i ~/.ssh/<youruser> <youruser>@xx.xxx.xx.002 -p 2222
>>ssh -i ~/.ssh/<youruser> <youruser>@xx.xxx.xx.003 -p 2222
Use these to login to remote server
If you still have access, great!
>>exit
Now check the root is disabled
>>ssh -i ~/.ssh/<youruser> root@xx.xxx.xx.xx1 -p 2222
>>exit
>>ssh -i ~/.ssh/<youruser> root@xx.xxx.xx.xx2 -p 2222
>>exit
>>ssh -i ~/.ssh/<youruser> root@xx.xxx.xx.xx3 -p 2222
You should get a “Permission denied”
Congrats you have created and secured your Virtual Servers!
Install Cabal and GHC – (install on all servers)
Next on each virtual server run the following:
sudo apt-get update -y
sudo apt-get upgrade -y
sudo apt-get install autoconf automake build-essential curl g++ git jq libffi-dev libgmp-dev libncursesw5 libssl-dev libsystemd-dev libtinfo-dev libtool make pkg-config tmux wget zlib1g-dev -y
Install Libsodium type
cd
git clone https://github.com/input-output-hk/libsodium
cd libsodium
git checkout 66f017f1
./autogen.sh
./configure
make
sudo make install
Install Cabal
To use the GHCup installer to install GHC and Cabal, type:
>>curl –proto ‘=https’ –tlsv1.2 -sSf https://get-ghcup.haskell.org | sh
During installation, when prompted:
- Press ENTER to proceed.
- To prepend the required PATH variable to
$HOME/.bashrc, typeP - When prompted to install haskell-language-server (HLS), type
N - When prompted to install stack, type
N - Press ENTER to proceed.
When GHCup finishes installing GHC and Cabal, type the following commands to reload your shell profile, and then confirm that GHCup installed correctly:
source $HOME/.bashrc
ghcup –version
If all is good you should get the The GHCup Haskell installer, version number below installed on your machine –
The GHCup Haskell installer, version v0.1.18.0
To install the version you need refer to table 1:

The format:
ghcup install ghc <LatestGHCVersionNumber>
ghcup set ghc <LatestGHCVersionNumber>
ghc –version
Type on each virtual terminal:
ghcup install ghc 8.10.7
ghcup set ghc 8.10.7
ghc –version
If successful you should get the message:
The Glorious Glasgow Haskell Compilation System, version 8.10.7
Set Cabal to the required version:
Format:
ghcup install cabal <CabalVersionNumber>
ghcup set cabal <CabalVersionNumber>
cabal –version
Type on each virtual machine:
ghcup install cabal 3.6.2.0
ghcup set cabal 3.6.2.0
cabal –version
If successful you will get the message:
compiled using version 3.6.2.0 of the Cabal library
To create a working directory to store source code and builds related to Cardano Node, type:
mkdir $HOME/git
cd $HOME/git
To download, compile and install libsecp256k1, type:
cd $HOME/git
git clone https://github.com/bitcoin-core/secp256k1
cd secp256k1
git checkout ac83be33
./autogen.sh
./configure –enable-module-schnorrsig –enable-experimental
make
make check
sudo make install
sudo ldconfig
Edit bashrc file
sudo nano $HOME/.bashrc
Paste the following at the end of the file:
# Set environment variables so that the compiler finds libsodium on your computer
export LD_LIBRARY_PATH=”/usr/local/lib:$LD_LIBRARY_PATH”
export PKG_CONFIG_PATH=”/usr/local/lib/pkgconfig:$PKG_CONFIG_PATH”
# Set an environment variable indicating the file path to configuration files and scripts
# related to operating your Cardano node
export NODE_HOME=”$HOME/cardano-my-node”
# Set an environment variable indicating the Cardano network cluster where your node runs
export NODE_CONFIG=”mainnet”
Do a Cntrl X
Y
<Enter>
To exit the editor
Create the directory referred to in the Bashrc file
mkdir $HOME/cardano-my-node
To reload your shell profile, type
source $HOME/.bashrc
Congrats!

Configure Your Firewall
On each virtual terminal:
# By default, deny all incoming and outgoing traffic
sudo ufw default deny incoming
sudo ufw default allow outgoing
# Allow ssh access
sudo ufw allow <22xx or your random port number>/tcp
# Allow cardano-node p2p port
sudo ufw allow 6000/tcp
# Enable firewall
sudo ufw enable
# Verify status
sudo ufw status numbered
Setting Up Chrony
Chrony is an implementation of the Network Time Protocol and helps to keep your computer’s time synchronized with NTP
sudo apt-get install chrony -y
Copy paste the following in each virtual terminal:
cat > $HOME/chrony.conf << EOF
pool time.google.com iburst minpoll 1 maxpoll 2 maxsources 3
pool ntp.ubuntu.com iburst minpoll 1 maxpoll 2 maxsources 3
pool us.pool.ntp.org iburst minpoll 1 maxpoll 2 maxsources 3
# This directive specify the location of the file containing ID/key pairs for
# NTP authentication.
keyfile /etc/chrony/chrony.keys
# This directive specify the file into which chronyd will store the rate
# information.
driftfile /var/lib/chrony/chrony.drift
# Uncomment the following line to turn logging on.
#log tracking measurements statistics
# Log files location.
logdir /var/log/chrony
# Stop bad estimates upsetting machine clock.
maxupdateskew 5.0
# This directive enables kernel synchronisation (every 11 minutes) of the
# real-time clock. Note that it can’t be used along with the ‘rtcfile’ directive.
rtcsync
# Step the system clock instead of slewing it if the adjustment is larger than
# one second, but only in the first three clock updates.
makestep 0.1 -1
EOF
Hit <enter>
Then move the file created:
sudo mv $HOME/chrony.conf /etc/chrony/chrony.conf
Restart chrony:
sudo systemctl restart chronyd.service
Compile the Cardano Node
cd $HOME/git
To download Cardano Node source code, type:
git clone https://github.com/input-output-hk/cardano-node.git
cd cardano-node
git fetch –all –recurse-submodules –tags
To switch the repository that you downloaded to your local computer to the latest tagged commit, type:
git checkout $(curl -s https://api.github.com/repos/input-output-hk/cardano-node/releases/latest | jq -r .tag_name)
To adjust the project configuration
cabal configure -O0 -w ghc-<GHCVersionNumber>
cabal configure -O0 -w ghc-8.10.7
cabal configure -O0 -w ghc-9.4.2
Edit the file cabal.project.local – type:
sudo nano cabal.project.local
Add the following to the end of the file:
package cardano-crypto-praos
flags: -external-libsodium-vrf
Then Cntrl X
Y
<Enter> To exit the editor
Type:
cabal build cardano-node cardano-cli
This will take a while to build have a break!!
If it ends early may have to type >>cabal update and rerun
To copy the cardano-node and cardano-cli binaries into the /usr/local/bin directory, type:
>>sudo cp -p “$(./scripts/bin-path.sh cardano-node)” /usr/local/bin/cardano-node
>>sudo cp -p “$(./scripts/bin-path.sh cardano-cli)” /usr/local/bin/cardano-cli
To confirm that the version installed
Type>>cardano-node –version
you should see message:
cardano-node 1.35.3 – linux-x86_64 – ghc-8.10
git rev ea6d78c775d0f70dde979b52de022db749a2cc32
type>>cardano-cli –version
you should see the message:
cardano-cli 1.35.3 – linux-x86_64 – ghc-8.10
git rev ea6d78c775d0f70dde979b52de022db749a2cc32
Congrats!!

Configure the Nodes
On each virtual terminal type:
>>cd $NODE_HOME
curl -O -J https://book.world.dev.cardano.org/environments/mainnet/config.json
curl -O -J https://book.world.dev.cardano.org/environments/mainnet/byron-genesis.json
curl -O -J https://book.world.dev.cardano.org/environments/mainnet/shelley-genesis.json
curl -O -J https://book.world.dev.cardano.org/environments/mainnet/alonzo-genesis.json
curl -O -J https://book.world.dev.cardano.org/environments/mainnet/topology.json
Rename files to mainnet-
mv topology.json mainnet-topology.json
mv config.json mainnet-config.json
source $HOME/.bashrc
sudo nano mainnet-topology.json
For relay node 1 and 2 paste the following in your mainnet-topology.json file
{
“Producers”: [
{
“addr”: “xx.xxx.xx.xxx-Block Producer Address”,
“port”: 6000,
“valency”: 1
},
{
“addr”: “relays-new.cardano-mainnet.iohk.io”,
“port”: 3001,
“valency”: 2
}
]
}
On your Block Producer Node ONLY edit the mainnet-topology-json and replace with:
{
“Producers”: [
{
“addr”: “<xx.xxx.xx.xxxRelayNode1-IPAddress>”,
“port”: 6000,
“valency”: 1
},
{
“addr”: “<xx.xxx.xx.xxx-RelayNode2-IPAddress>”,
“port”: 6000,
“valency”: 1
}
]
}
Create a Bash Script to run a Node on each virtual server Node
cd $NODE_HOME
Type>> echo $NODE_HOME
You will see the location of your home directory. You will need this later.
/home/<youruser>/cardano-my-node
Current directory on each server should be:
<youruser>@relay1:~/cardano-my-node$
and
<youruser>@relay2:~/cardano-my-node$
and
<youruser>@production:~/cardano-my-node$
Create a new file called startCardanoNode.sh
>>sudo touch startCardanoNode.sh
You will be prompted for your password
Next edit the new file:
>>sudo nano startCardanoNode.sh
And copy and paste the following:
#!/bin/bash
#
# Set variables to indicate Cardano Node options
#
# Set a variable to indicate the port where the Cardano Node listens
PORT=6000
# Set a variable to indicate the local IP address of the computer where Cardano Node runs
# 0.0.0.0 listens on all local IP addresses for the computer
HOSTADDR=0.0.0.0
# Set a variable to indicate the file path to your topology file
TOPOLOGY=<NodeHomeValue>/mainnet-topology.json
# Set a variable to indicate the folder where Cardano Node stores blockchain data
DB_PATH=<NodeHomeValue>/db
# Set a variable to indicate the path to the Cardano Node socket for Inter-process communication (IPC)
SOCKET_PATH=<NodeHomeValue>/db/socket
# Set a variable to indicate the file path to your main Cardano Node configuration file
CONFIG=<NodeHomeValue>/mainnet-config.json
#
# Run Cardano Node using the options that you set using variables
#
/usr/local/bin/cardano-node run –topology ${TOPOLOGY} –database-path ${DB_PATH} –socket-path ${SOCKET_PATH} –host-addr ${HOSTADDR} –port ${PORT} –config ${CONFIG}
Edit <NodeHomeValue> to be location of your home directory e.g: /home/<youruser>/cardano-my-node
Do a Cntrl X to exit the editor
Y to save
<Enter>
Set permissions for the startCardanoNode.sh file, type:
sudo chown <youruser>:<youruser> startCardanoNode.sh
chmod +x $NODE_HOME/startCardanoNode.sh
create the folder where Cardano Node stores blockchain data, type:
mkdir $NODE_HOME/db
To run Cardano Node as a service so if the system reboots the node will start automatically
Create a file called cardano-node.service
>>sudo touch cardano-node.service
Enter your password if prompted
Edit the blank file
>>sudo nano cardano-node.service
Copy/paste the following:
# The Cardano Node service (part of systemd)
# file: /etc/systemd/system/cardano-node.service
[Unit]
Description = Cardano Node Service
Wants = network-online.target
After = network-online.target
[Service]
User = <UserValue>
Type = simple
WorkingDirectory = <NodeHomeValue>
ExecStart = /bin/bash -c ‘<NodeHomeValue>/startCardanoNode.sh’
KillSignal = SIGINT
RestartKillSignal = SIGINT
TimeoutStopSec = 300
LimitNOFILE = 32768
Restart = always
RestartSec = 5
SyslogIdentifier = cardano-node
[Install]
WantedBy = multi-user.target
Edit <UserValue> and <NodeHomeValue> values – Where user value is your Username (type>> echo $USER) and <NodeHomeValue> is your Home directory path (type >>echo $HOME_USER)
Cntrl X to exit editor
Y to save
<Enter> to finish
move the cardano-node.service file to the folder /etc/systemd/system and set file permissions, type:
sudo mv $NODE_HOME/cardano-node.service /etc/systemd/system/cardano-node.service
sudo chmod 644 /etc/systemd/system/cardano-node.service
To start Cardano Node as a service when the server boots, type:
sudo systemctl daemon-reload
sudo systemctl enable cardano-node.service
Starting the Nodes
Type the following on each virtual terminal to start the nodes!
>>sudo systemctl start cardano-node
Install gLiveView, a monitoring tool. Type
>>cd $NODE_HOME
>>sudo apt install bc tcptraceroute -y
>>curl -s -o gLiveView.sh https://raw.githubusercontent.com/cardano-community/guild-operators/master/scripts/cnode-helper-scripts/gLiveView.sh
>> curl -s -o env https://raw.githubusercontent.com/cardano-community/guild-operators/master/scripts/cnode-helper-scripts/env
>>chmod 755 gLiveView.sh
Then Run the following to modify env with the updated file locations.
sed -i env \
-e “s/\#CONFIG=\”\${CNODE_HOME}\/files\/config.json\”/CONFIG=\”\${NODE_HOME}\/config.json\”/g” \
-e “s/\#SOCKET=\”\${CNODE_HOME}\/sockets\/node0.socket\”/SOCKET=\”\${NODE_HOME}\/db\/socket\”/g”
**If this errors try previous step and this one again
Edit env file and change to mainnet
>>sudo nano env
And Edit the lines
CONFIG=”${CNODE_HOME}/files/config.json”
Change to:
CONFIG=”${CNODE_HOME}/files/mainnet-config.json”
Do a Cntrl X to exit
Y to save
<enter> to finish
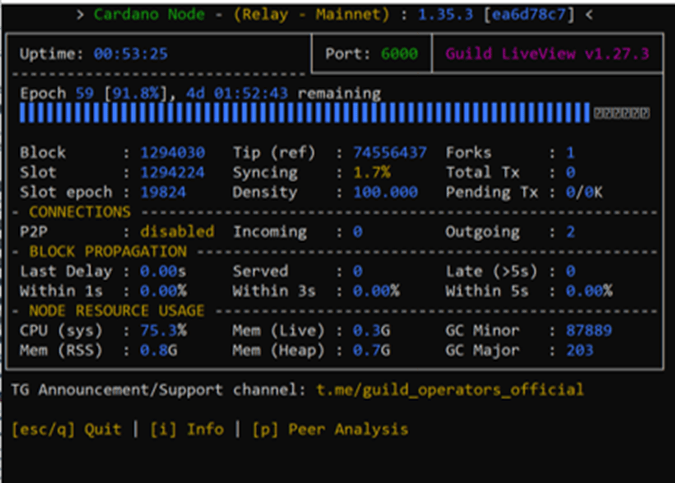
***Run GLIVE View****
./gLiveView.sh
If all is good you will see something like this and the words “syncing”.
Wait for your Nodes to Sync – It will take some time!!
12-24hrs depending on your setup!!
You can use the following commands on your node if required:
Show Node Status
sudo systemctl status cardano-node
***Start Cardano Node***
sudo systemctl start cardano-node
Stop Cardano Node
sudo systemctl stop cardano-node
Restart Node Service
sudo systemctl reload-or-restart cardano-node
***Cardano Node continuous Log ***
journalctl –unit=cardano-node –follow
reboot system
sudo shutdown -rYou can access each node with the following commands >
>>ssh -i ~/.ssh/<youruser> <youruser>@xx.xxx.xx.xx1 -p 22xx
>>ssh -i ~/.ssh/<youruser> <youruser>@xx.xxx.xx.xx2 -p 22xx
>>ssh -i ~/.ssh/<youruser> <youruser>@xx.xxx.xx.xx3 -p 22xx
If you get stuck at ‘starting…’ for some time in gLiveView you may have skipped something, go back and re-check or
Try:
Stop the Cardano Node –
In cardano-my-node directory:
sudo systemctl stop cardano-node
Delete db directory –
rm -r db
start cardano node again
sudo systemctl start cardano-node
Monitor with gLiveView
./gLiveView.sh
When your nodes are synced, it will look like this:
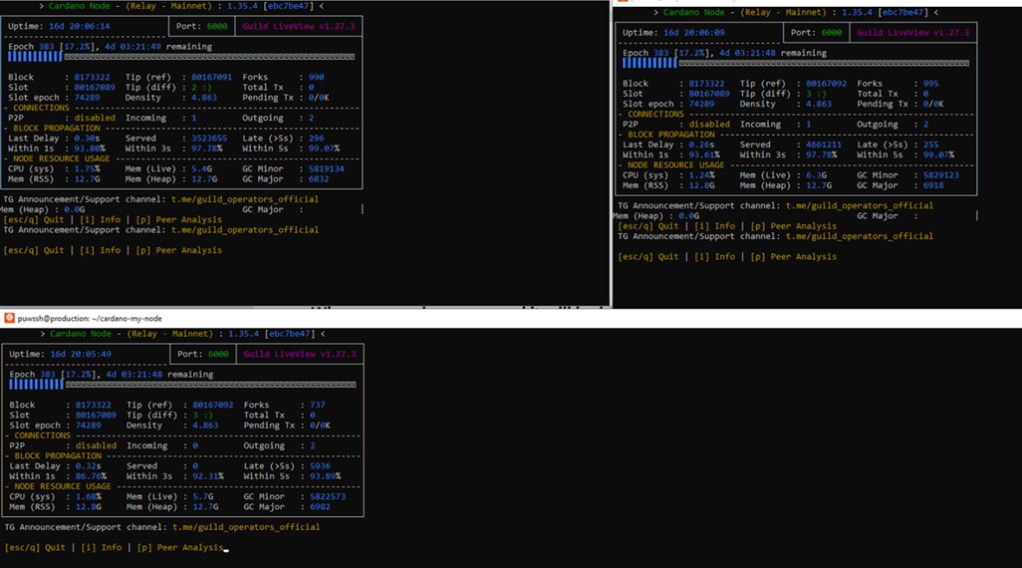
CONGRATULATIONS!!! YOUR NODES ARE SYNCED

Air-Gapped Machine
You will need an offline “air-gapped” machine to create the keys for your stake pool. A basic windows laptop will be ideal.
The machine should not have been connected to the internet for any length of time to avoid keylogging, malware etc. The air-gapped machine needs to have:
- WSL (Windows Subsystem for Linux)
- Ubuntu
These can be downloaded from the Microsoft store as seen at the start of this guide.
On your air-gapped laptop:
Download WSL from the Microsoft store
Download Ubuntu 20.04 from the Microsoft store
—————————————————————-
Copy the Cardano cli binary to your air gapped machine. You will need a usb stick to transfer.
**Back to your virtual machine. On your block producer Node
>>cd /usr
>> cd local/bin
Type ls
You should see the cardano-cli file
We need to copy this file to USB and then copy to our air gapped machine.
In your Windows browser on your main machine download Filezilla from:
https://filezilla-project.org/download.php?type=client
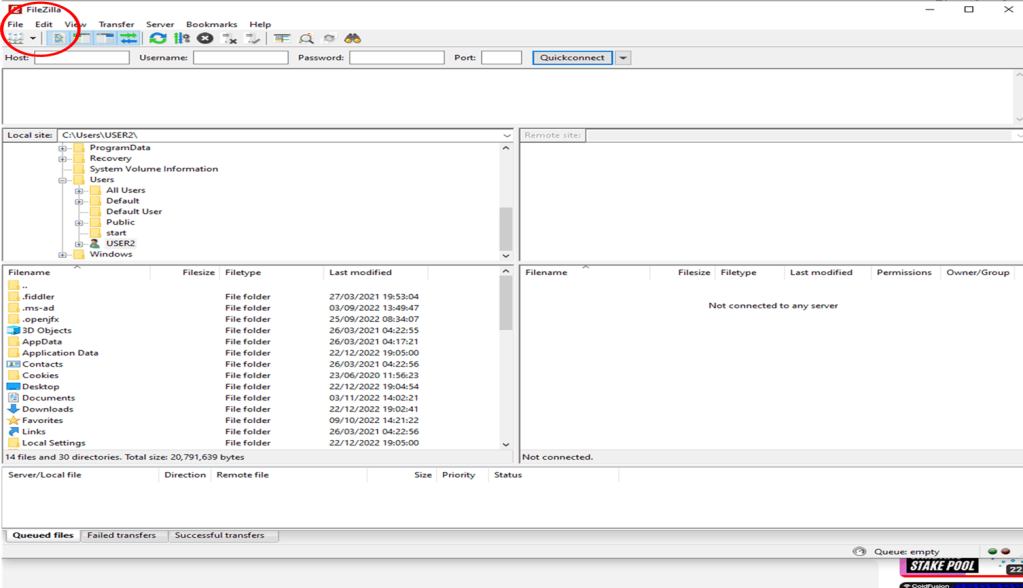
Select File in Filezilla and then Site Manager
Click ‘New Site’
And name your connection for example: ‘Prodnode’
On the right-hand side select File transfer Protocol ‘SFTP SSH File Transfer Protocol’
Enter the IP address of your node and Port Number
And the User
And the Password
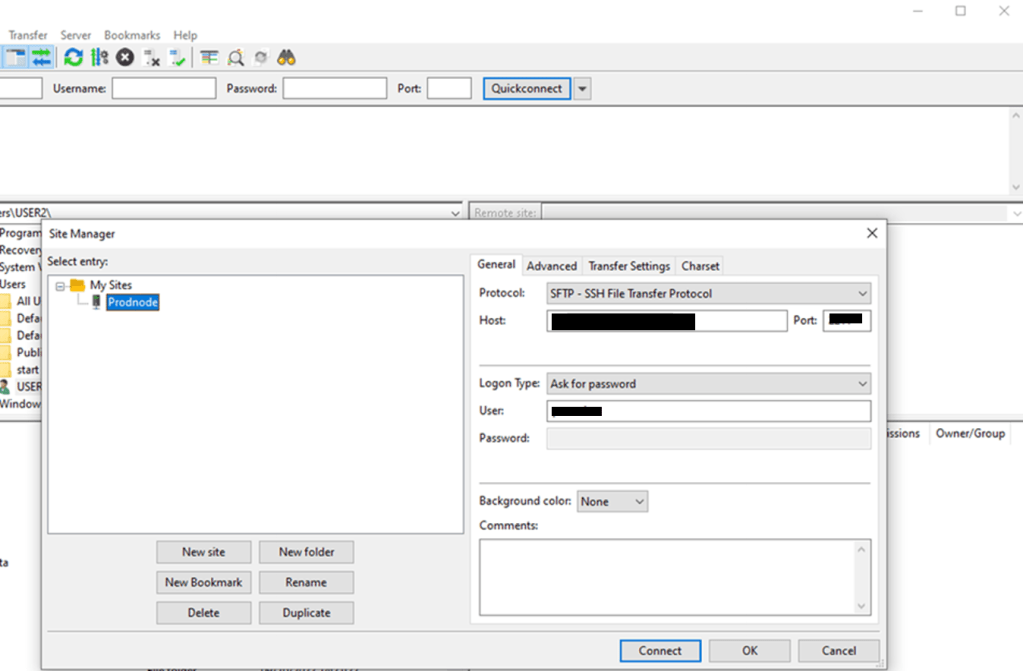
Hit connect and you should be good to go!
Navigate to the remote site directory
/usr/local/bin
You should see the cardano-cli file
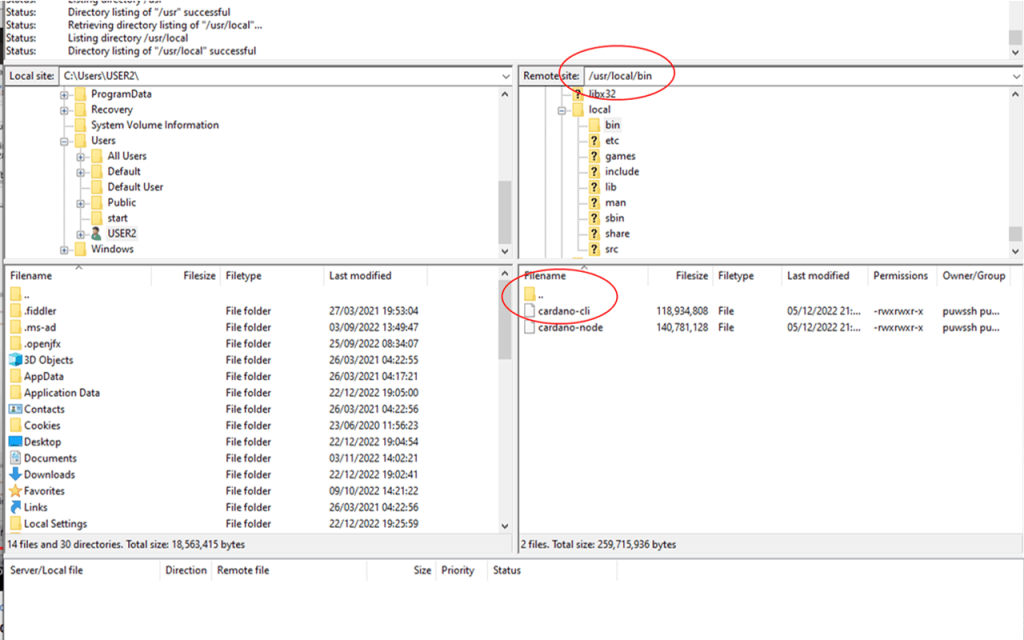
Right-click the cardano-cli file and download it.
Copy to your USB stick
**On your air-gapped machine**
Copy the cardano-cli file from USB to C: drive on your windows desktop
Then copy to the Ubuntu terminal
Enter the following in Ubuntu to see what disks are mounted:
df
check the location for drive c:
for example /mnt/c
enter the following to copy the cardano-cli from drive c on windows to Ubuntu
sudo cp /mnt-your drive-location/c/cardano-cli /usr/local/bin
type ls
to see if the file has been copied – you should see cardano-cli
Give execute permissions to the file
sudo chmod +x /usr/local/bin/cardano-cli
edit bashrc file
sudo nano $HOME/.bashrc
add the following to the end of the file
export NODE_HOME=”$HOME/cardano-my-node”
Cntrl X to Exit
Create the Cardano HOME variable
mkdir $HOME/cardano-my-node
to reload shell file:
source $HOME/.bashrc
To run Cardano-cli you need to install libsecp256k1
sudo nano $HOME/.bashrc
add the following to the end of the file:
export LD_LIBRARY_PATH=”/usr/local/lib:$LD_LIBRARY_PATH”
export PKG_CONFIG_PATH=”/usr/local/lib/pkgconfig:$PKG_CONFIG_PATH”
Reload the HOME/.bashrc
source $HOME/.bashrc
create the folder
sudo mkdir /usr/local/lib/pkgconfig
Back on your block producer node locate the 4 files below for libsecp256k1 and copy them to the folder you just created on the air-gapped machine via the USB stick.
/usr/local/lib/libsecp256k1.a
/usr/local/lib/libsecp256k1.la
/usr/local/lib/libsecp256k1.so.0.0.0
/usr/local/lib/pkgconfig/libsecp256k1.pc
On your air-gapped machine use the following to copy the files from your c drive
sudo cp /mnt/c/libsecp256k1.a /usr/local/lib
sudo cp /mnt/c/libsecp256k1.la /usr/local/lib
sudo cp /mnt/c/libsecp256k1.so.0.0.0 /usr/local/lib
sudo cp /mnt/c/libsecp256k1.pc /usr/local/lib/pkgconfig
to set file permissions on the air-gapped machine type:
cd /usr/local/lib
sudo chown root:root libsecp256k1.*
sudo chmod 644 libsecp256k1.a
sudo chmod 755 libsecp256k1.la
sudo chmod 755 libsecp256k1.so.0.0.0
sudo chown root:root ./pkgconfig/libsecp256k1.pc
sudo chmod 644 ./pkgconfig/libsecp256k1.pc
create symbolic links on the air-gapped machine type:
sudo ln -s libsecp256k1.so.0.0.0 libsecp256k1.so
sudo ln -s libsecp256k1.so.0.0.0 libsecp256k1.so.0
Type
ls la
Check that the following links have been created
lrwxrwxrwx root root libsecp256k1.so -> libsecp256k1.so.0.0.0
lrwxrwxrwx root root libsecp256k1.so.0 -> libsecp256k1.so.0.0.0
Then Update symbolic links
sudo ldconfig
Create keys for block producing node
On your block producing node you need to generate 3 keys.
· stake pool cold key (node.cert)
· stake pool hot key (kes.skey)
· stake pool VRF key (vrf.skey)
cd $NODE_HOME
cardano-cli node key-gen-KES \
–verification-key-file kes.vkey \
–signing-key-file kes.skey
*** You will need to regenerate the KES key every 90 days.
On your air-gapped machine you need to create and store your Cold Keys
First make the directory to store the cold keys on your air-gapped machine
mkdir $HOME/cold-keys
pushd $HOME/cold-keys
Make the cold keys and counter file
cardano-cli node key-gen \
–cold-verification-key-file node.vkey \
–cold-signing-key-file $HOME/cold-keys/node.skey \
–operational-certificate-issue-counter node.counter
Type ls
And you should see three files listed:
node.counter
node.skey
node.vkey
***IMPORTANT – Back up your keys on different USB sticks
Create a cold-keys folder on your Windows machine on the C:/ drive
On your Ubuntu terminal copy the three files to your Windows machine.
sudo cp node.counter /mnt/c/cold-keys
sudo cp node.skey /mnt/c/cold-keys
sudo cp node.vkey /mnt/c/cold-keys
Check your Windows machine c: drive and you should see the three files there.
*** Remember to copy your keys to multiple USBs you will need these keys to run your stake pool!
Next on your Block Producer Node
Determine the number of slots per KES period from Genesis file
pushd +1
slotsPerKESPeriod=$(cat $NODE_HOME/shelley-genesis.json | jq -r ‘.slotsPerKESPeriod’)
echo slotsPerKESPeriod: ${slotsPerKESPeriod}
You will see something like this:
slotsPerKESPeriod: 129600
***TO CONTINUE YOUR NODE MUST BE FULLY SYNCED CHECK YOUR EPOCH is the same as on https://pooltool.io/
On your Block Producer Node
Edit bashrc file
sudo nano $HOME/.bashrc
Add the following to the end of the file
export CARDANO_NODE_SOCKET_PATH=”/home/yourusername/cardano-my-node/db/socket”
CNTrl X to Exit
Y to save
Then ENTER
To reload changes
source $HOME/.bashrc
slotNo=$(cardano-cli query tip –mainnet | jq -r ‘.slot’)
echo slotNo: ${slotNo}
You should see something like this:
slotNo: 80217744
Next calculate the KES period
kesPeriod=$((${slotNo} / ${slotsPerKESPeriod}))
echo kesPeriod: ${kesPeriod}
startKesPeriod=${kesPeriod}
echo startKesPeriod: ${startKesPeriod}
You should see something like this
startKesPeriod: 618
Copy Kes.vkey file to your air-gapped machine
a)using Filezilla to transfer to your desktop –
b)Then to a USB
c) transfer from usb to c drive:
d) finally over to your Ubuntu terminal on air gapped machine using the command below.
sudo cp /mnt/c/cold-keys/kes.vkey /home/yourusername/cold-keys
type ls
you should see kes.vkey in your cold keys directory
Now still on the air-gapped machine copy paste the code below – Change StartKesPeriod to the value received previously Example: (618)
cardano-cli node issue-op-cert \
–kes-verification-key-file kes.vkey \
–cold-signing-key-file $HOME/cold-keys/node.skey \
–operational-certificate-issue-counter $HOME/cold-keys/node.counter \
–kes-period <startKesPeriod> \
–out-file node.cert
This will create an Operational Certificate
Type ls
You should see a node.cert file
Use the following to copy from Ubuntu terminal to c drive in Windows:
sudo cp node.cert /mnt/c/cold-keys
Then use Filezilla to upload node.cert from your USB to your block producer node home environment
On your Block Producing Node
Make a VRF key pair
cardano-cli node key-gen-VRF \
–verification-key-file vrf.vkey \
–signing-key-file vrf.skey
On your air-gapped machine
Copy the vrf.vkey to your air-gapped machine via Filezilla and USB stick
sudo cp /mnt/c/cold-keys/vrf.vkey /home/yourusername/cold-keys
On block producing node
Update vrf key permissions to read-only
chmod 400 vrf.skey
Now stop the stake pool running on Block Producing node
sudo systemctl stop cardano-node
Update start up script with the KES, VRF and Operation Certificate
Copy paste the following:
cat > $NODE_HOME/startBlockProducingNode.sh << EOF
DIRECTORY=$NODE_HOME
PORT=6000
HOSTADDR=0.0.0.0
TOPOLOGY=\${DIRECTORY}/mainnet-topology.json
DB_PATH=\${DIRECTORY}/db
SOCKET_PATH=\${DIRECTORY}/db/socket
CONFIG=\${DIRECTORY}/mainnet-config.json
KES=\${DIRECTORY}/kes.skey
VRF=\${DIRECTORY}/vrf.skey
CERT=\${DIRECTORY}/node.cert
/usr/local/bin/cardano-node run +RTS -N -A16m -qg -qb -RTS –topology \${TOPOLOGY} –database-path \${DB_PATH} –socket-path \${SOCKET_PATH} –host-addr \${HOSTADDR} –port \${PORT} –config \${CONFIG} –shelley-kes-key \${KES} –shelley-vrf-key \${VRF} –shelley-operational-certificate \${CERT}
EOF
Now start the Block Producer node
sudo systemctl start cardano-node
Monitor with
./gLiveView.sh
Wait for the Block Producing node to start syncing
Setting Up Payments and Stake Keys
On Block Producing node
cardano-cli query protocol-parameters \
–mainnet \
–out-file params.json
Now on Air-Gapped Machine
Create payment key pair payment.skey & payment.vkey
cd $NODE_HOME
cardano-cli address key-gen \
–verification-key-file payment.vkey \
–signing-key-file payment.skey
Create stake address key pair stake.skey & stake.vkey
cardano-cli stake-address key-gen \
–verification-key-file stake.vkey \
–signing-key-file stake.skey
Create stake address stake.addr
cardano-cli stake-address build \
–stake-verification-key-file stake.vkey \
–out-file stake.addr \
–mainnet
Build a payment address payment.addr
cardano-cli address build \
–payment-verification-key-file payment.vkey \
–-stake-verification-key-file stake.vkey \
–out-file payment.addr \
–mainnet
Next copy payment.addr to your Block Producing node
Copy to your Windows c: drive and then copy to USB stick and transfer to Block Producing mode via USB and Filezilla
On air-gapped machine
Use>> sudo cp payment.addr /mnt/c/cold-keys
to copy to c drive and onto USB stick
Next we will Fund Payment Address on Block Producing Node
To view your payment address
cat payment.addr
You will see something like:
addr1q8glr6crkhrypgwkfrgffh46cuee8kt4xzrvjszt6n6ceck7apl7txnj0w82ychft9l7utffn47xnm50c……
Fund the payment address with ADA from your wallet (Nami, Yoroi, Eternl etc). If you don’t have a wallet address
Set one up here: https://namiwallet.io/
Ensure you fund more than your initial amount to allow for fees etc.
On the Block Producer node check your funds.
cardano-cli query utxo \
–address $(cat payment.addr) \
–mainnet
You should see something like this:
TxHash TxIx Amount
————————————————————————————–
cd20246dc10bdd499474c6e432b6f3d899d18b60497fa343d553dd3cafa84009 0 5000000 lovelace + TxOutDatumNone
5000000 lovelace equates to 5 ADA
****Important – Make backup copies of payment and staking keys on offline USB sticks.
Registering Your Stake Address
You need to register your stake address and delegate a pledge (ADA) to your pool.
To register a stake address on the blockchain:
On the air-gapped machine
Create a certificate stake.cert
cardano-cli stake-address registration-certificate \
–stake-verification-key-file stake.vkey \
–out-file stake.cert
Copy the stake.cert file to the Block Producer node via USB stick and Filezilla as before.
Use:
sudo cp stake.cert /mnt/c/cold-keys
copy to USB and transfer to main machine via Filezilla.
On the Block Producing node
We need to find the tip of the blockchain to set the invalid-hereafter parameter
currentSlot=$(cardano-cli query tip –mainnet | jq -r ‘.slot’)
echo Current Slot: $currentSlot
You should see something like this:
Current Slot: 80243288
Find your balance and UTXO – copy paste the following:
cardano-cli query utxo \
–address $(cat payment.addr) \
–mainnet > fullUtxo.out
tail -n +3 fullUtxo.out | sort -k3 -nr > balance.out
cat balance.out
tx_in=””
total_balance=0
while read -r utxo; do
in_addr=$(awk ‘{ print $1 }’ <<< “${utxo}”)
idx=$(awk ‘{ print $2 }’ <<< “${utxo}”)
utxo_balance=$(awk ‘{ print $3 }’ <<< “${utxo}”)
total_balance=$((${total_balance}+${utxo_balance}))
echo TxHash: ${in_addr}#${idx}
echo ADA: ${utxo_balance}
tx_in=”${tx_in} –tx-in ${in_addr}#${idx}”
done < balance.out
txcnt=$(cat balance.out | wc -l)
echo Total ADA balance: ${total_balance}
echo Number of UTXOs: ${txcnt}
You should see something like this:
Total ADA balance: 5000000
Number of UTXOs: 1
Find the amount of the deposit required to register a stake address.
stakeAddressDeposit=$(cat $NODE_HOME/params.json | jq -r ‘.stakeAddressDeposit’)
echo stakeAddressDeposit : $stakeAddressDeposit
You should see something like this:
stakeAddressDeposit : 2000000
Run the build-raw transaction command – Copy and paste the following:
cardano-cli transaction build-raw \
${tx_in} \
–tx-out $(cat payment.addr)+0 \
–invalid-hereafter $(( ${currentSlot} + 10000)) \
–fee 0 \
–out-file tx.tmp \
–certificate stake.cert
Calculate the current minimum fee:
fee=$(cardano-cli transaction calculate-min-fee \
–tx-body-file tx.tmp \
–tx-in-count ${txcnt} \
–tx-out-count 1 \
–mainnet \
–witness-count 2 \
–byron-witness-count 0 \
–protocol-params-file params.json | awk ‘{ print $1 }’)
echo fee: $fee
You should see something like this:
fee: 178789
***Ensure the funds are greater than the stake address deposit and transaction fee or the transaction will fail
Calculate your change:
txOut=$((${total_balance}-${stakeAddressDeposit}-${fee}))
echo Change Output: ${txOut}
You will see something like this:
Change Output: 2821211
Build the transaction which will register your stake address. Copy paste the following:
cardano-cli transaction build-raw \
${tx_in} \
–tx-out $(cat payment.addr)+${txOut} \
–invalid-hereafter $(( ${currentSlot} + 10000)) \
–fee ${fee} \
–certificate-file stake.cert \
–out-file tx.raw
Copy tx.raw to the air-gapped machine
On the air-gapped machine sign the transaction with the payment and stake secret keys.
cardano-cli transaction sign \
–tx-body-file tx.raw \
–signing-key-file payment.skey \
–signing-key-file stake.skey \
–mainnet \
–out-file tx.signed
Copy the tx.signed to your Block Producer node environment via usb and Filezilla as before.
On the Block Producer node submit the signed transaction
cardano-cli transaction submit \
–tx-file tx.signed \
–mainnet
You should see:
“Transaction successfully submitted“
CONGRATS!

Registering The Stake Pool
On the Block Producer node
Ticker Must be 3-5 characters in length (No special characters)
The description cannot be more than 255 characters
Copy and paste the following:
cat > poolMetaData.json << EOF
{
“name”: “MyPoolName”,
“description”: “My pool description”,
“ticker”: “MPN”,
“homepage”: “https://myadapoolname.com”
}
EOF
Calculate the hash of your metadata file.
and save to poolMetaDataHash.txt
cardano-cli stake-pool metadata-hash –pool-metadata-file poolMetaData.json > poolMetaDataHash.txt
Copy poolMetaDataHash.txt to your air gapped machine
Upload poolMetaData.json to a website that you run
The URL should be less than 65 characters if it’s not you can shorten it with Tiny URL https://tinyurl.com/app
Compare hashes of local and uploaded file
cardano-cli stake-pool metadata-hash –pool-metadata-file <(curl -s -L https:www.yourwebsite.com/Your link to poolMetaData.json)
You should see something like this
80fef913cdef61bb8c9cbb012e6077b0d5477500c1a4f6e164640acfd0c50dd6
Type
cat poolMetaDataHash.txt
The value should be the same as your uploaded URL
Find the minimum pool cost.
On the Block Producer node
minPoolCost=$(cat $NODE_HOME/params.json | jq -r .minPoolCost)
echo minPoolCost: ${minPoolCost}
You should see:
minPoolCost: 340000000
Create a Registration Certificate for the Stake Pool
Update the code below with Metadata URL and Relay Node information
On air-gapped machine
cardano-cli stake-pool registration-certificate \
–cold-verification-key-file $HOME/cold-keys/node.vkey \
–vrf-verification-key-file vrf.vkey \
–pool-pledge 2000000 \
–pool-cost 340000000 \
–pool-margin 0.60 \
–pool-reward-account-verification-key-file stake.vkey \
–pool-owner-stake-verification-key-file stake.vkey \
–mainnet \
–pool-relay-port 6000 \
–pool-relay-ipv4 xx.xxx.xx.xxx \
–pool-relay-port 6000 \
–pool-relay-ipv4 xx.xxx.xx.xxx\
–metadata-url https://yourtinyurl.com \
–metadata-hash $(cat poolMetaDataHash.txt) \
–out-file pool.cert
Example Edit the above with your required values
Pool Pledge 200000 = 2 ADA (More Ada the better – Your pool stake in your own pool, 1,000,000 Lovelace is 1 ADA)
Pool Cost 340000000 = 340 ADA (340 is the minimum, you do not pay this, this is paid to you first out of any rewards)
Pool Margin 0.60 = 60% (Your share of the rewards)
pool-relay-ipv4 xx.xxx.xx.xxx – relay1 ip address
pool-relay-ipv4 xx.xxx.xx.xxx – relay2 ip address
Metadata-url https://yourtinyurl.com/ – URL to the MetaData.json file this should be no longer than 64 characters – you can use Tiny Url if yours is longer
Copy the created file pool.cert to the Block Producing relay environment using usb stick and Filezilla as before
Pledge stake to your stake pool.
On your air-gapped machine – Copy paste the following:
cardano-cli stake-address delegation-certificate \
–stake-verification-key-file stake.vkey \
–cold-verification-key-file $HOME/cold-keys/node.vkey \
–out-file deleg.cert
Copy the created file deleg.cert to the Block Producing relay environment using usb stick and Filezilla as before
We need to find the tip of the blockchain to set the invalid-hereafter parameter.
On Block Producer node
currentSlot=$(cardano-cli query tip –mainnet | jq -r ‘.slot’)
echo Current Slot: $currentSlot
You will see something like this:
Current Slot: 80256851
Find your balance and UTXOs. – copy paste the following:
cardano-cli query utxo \
–address $(cat payment.addr) \
–mainnet > fullUtxo.out
tail -n +3 fullUtxo.out | sort -k3 -nr > balance.out
cat balance.out
tx_in=””
total_balance=0
while read -r utxo; do
in_addr=$(awk ‘{ print $1 }’ <<< “${utxo}”)
idx=$(awk ‘{ print $2 }’ <<< “${utxo}”)
utxo_balance=$(awk ‘{ print $3 }’ <<< “${utxo}”)
total_balance=$((${total_balance}+${utxo_balance}))
echo TxHash: ${in_addr}#${idx}
echo ADA: ${utxo_balance}
tx_in=”${tx_in} –tx-in ${in_addr}#${idx}”
done < balance.out
txcnt=$(cat balance.out | wc -l)
echo Total ADA balance: ${total_balance}
echo Number of UTXOs: ${txcnt}
You will see something like this:
Total ADA balance: 2821211
Number of UTXOs: 1
Find the deposit fee for a pool.
stakePoolDeposit=$(cat $NODE_HOME/params.json | jq -r ‘.stakePoolDeposit’)
echo stakePoolDeposit: $stakePoolDeposit
You will see something like this
stakePoolDeposit: 500000000
***At the moment you will need 500 ADA deposit Fee
Build-raw transaction – copy paste the following:
cardano-cli transaction build-raw \
${tx_in} \
–tx-out $(cat payment.addr)+$(( ${total_balance} – ${stakePoolDeposit})) \
–invalid-hereafter $(( ${currentSlot} + 10000)) \
–fee 0 \
–certificate-file pool.cert \
–certificate-file deleg.cert \
–out-file tx.tmp
Calculate the minimum fee– copy paste the following:
fee=$(cardano-cli transaction calculate-min-fee \
–tx-body-file tx.tmp \
–tx-in-count ${txcnt} \
–tx-out-count 1 \
–mainnet \
–witness-count 3 \
–byron-witness-count 0 \
–protocol-params-file params.json | awk ‘{ print $1 }’)
echo fee: $fee
You will see something like:
fee: 199865
Calculate change – copy paste the following:
txOut=$((${total_balance}-${stakePoolDeposit}-${fee}))
echo txOut: ${txOut}
You will see something like:
txOut: 12621346
Build the transaction – copy paste the following:
cardano-cli transaction build-raw \
${tx_in} \
–tx-out $(cat payment.addr)+${txOut} \
–invalid-hereafter $(( ${currentSlot} + 10000)) \
–fee ${fee} \
–certificate-file pool.cert \
–certificate-file deleg.cert \
–out-file tx.raw
Copy tx.raw to the air-gapped machine via USB stick
Sign the transaction on the air-gapped machine – copy paste the following:
cardano-cli transaction sign \
–tx-body-file tx.raw \
–signing-key-file payment.skey \
–signing-key-file $HOME/cold-keys/node.skey \
–signing-key-file stake.skey \
–mainnet \
–out-file tx.signed
Copy tx.signed to the Block Producer node environment.
Send the transaction
cardano-cli transaction submit \
–tx-file tx.signed \
–mainnet
You should see Transaction Successfully Submitted.
Congrats!

Verifying Stake Pool Operation
On the air-gapped machine
cardano-cli stake-pool id –cold-verification-key-file $HOME/cold-keys/node.vkey –output-format hex > stakepoolid.txt
cat stakepoolid.txt
copy stakepoolid.txt to Block Producer node environment via USB stick and Filezilla
On the Block Producer Environment
Verify stake pool ID is included in the blockchain.
cardano-cli query stake-snapshot –stake-pool-id $(cat stakepoolid.txt) –mainnet
A non-empty string means you are registered congrats!
You can check your stake pool id on Cardano scan https://cardanoscan.io/
Configure Your Topology Files On Relay Node 1
***This section is on relay node1
Create the topologyUpdater.sh script which publishes your node information to a topology fetch list.
We need to do this to propagate our node information so delegators can find your pool. Copy paste the following:
cat > $NODE_HOME/topologyUpdater.sh << EOF
#!/bin/bash
# shellcheck disable=SC2086,SC2034
USERNAME=$(whoami)
CNODE_PORT=6000 # must match your relay node port as set in the startup command
CNODE_HOSTNAME=”CHANGE ME” # optional. must resolve to the IP you are requesting from
CNODE_BIN=”/usr/local/bin”
CNODE_HOME=$NODE_HOME
CNODE_LOG_DIR=”\${CNODE_HOME}/logs”
GENESIS_JSON=”\${CNODE_HOME}/shelley-genesis.json”
NETWORKID=\$(jq -r .networkId \$GENESIS_JSON)
CNODE_VALENCY=1 # optional for multi-IP hostnames
NWMAGIC=\$(jq -r .networkMagic < \$GENESIS_JSON)
[[ “\${NETWORKID}” = “Mainnet” ]] && HASH_IDENTIFIER=”–mainnet” || HASH_IDENTIFIER=”–testnet-magic \${NWMAGIC}”
[[ “\${NWMAGIC}” = “764824073” ]] && NETWORK_IDENTIFIER=”–mainnet” || NETWORK_IDENTIFIER=”–testnet-magic \${NWMAGIC}”
export PATH=”\${CNODE_BIN}:\${PATH}”
export CARDANO_NODE_SOCKET_PATH=”\${CNODE_HOME}/db/socket”
blockNo=\$(/usr/local/bin/cardano-cli query tip \${NETWORK_IDENTIFIER} | jq -r .block )
# Note:
# if you run your node in IPv4/IPv6 dual stack network configuration and want announced the
# IPv4 address only please add the -4 parameter to the curl command below (curl -4 -s …)
if [ “\${CNODE_HOSTNAME}” != “CHANGE ME” ]; then
T_HOSTNAME=”&hostname=\${CNODE_HOSTNAME}”
else
T_HOSTNAME=”
fi
if [ ! -d \${CNODE_LOG_DIR} ]; then
mkdir -p \${CNODE_LOG_DIR};
fi
curl -s “https://api.clio.one/htopology/v1/?port=\${CNODE_PORT}&blockNo=\${blockNo}&valency=\${CNODE_VALENCY}&magic=\${NWMAGIC}\${T_HOSTNAME}” | tee -a \$CNODE_LOG_DIR/topologyUpdater_lastresult.json
EOF
Add permissions and run the script
cd $NODE_HOME
chmod +x topologyUpdater.sh
./topologyUpdater.sh
If successful you will see something like:
{ “resultcode”: “201”, “datetime”:”2020-07-28 01:23:45″, “clientIp”: “1.2.3.4”, “iptype”: 4, “msg”: “nice to meet you” }
Add a crontab job to automatically run topologyUpdater.sh every hour on the 33rd minute. Copy paste the following:
cat > $NODE_HOME/crontab-fragment.txt << EOF
33 * * * * ${NODE_HOME}/topologyUpdater.sh
EOF
crontab -l | cat – ${NODE_HOME}/crontab-fragment.txt > ${NODE_HOME}/crontab.txt && crontab ${NODE_HOME}/crontab.txt
rm ${NODE_HOME}/crontab-fragment.txt
if you get the error no crontab for user
then
crontab -u username -e

you will be asked to select an editor – Select option 1. Nano
and then type:

crontab -l

You should see something like:
33 * * * * /home/yourusername/cardano-my-node/topologyUpdater.sh
***This will run for 4hrs approx be patient!
After 4 hrs your node will be included in the topology fetch list
You can check the log file by typing:
cd $NODE_HOME/logs
cat topologyUpdater_lastresult.json
****After 4 hours and 4 Updates continue with the following….
UPDATE TOPOLOGY FILES ON RELAY NODE 1
***This should be carried out on Relay 1 – copy paste the following add your Block Producing node address.
cat > $NODE_HOME/relay-topology_pull.sh << EOF
#!/bin/bash
BLOCKPRODUCING_IP=xx.xxx.xx.xxx
BLOCKPRODUCING_PORT=6000
curl -s -o $NODE_HOME/mainnet-topology.json “https://api.clio.one/htopology/v1/fetch/?max=20&customPeers=\${BLOCKPRODUCING_IP}:\${BLOCKPRODUCING_PORT}:1|relays-new.cardano-mainnet.iohk.io:3001:2”
EOF
Add permissions and pull new topology files.
chmod +x relay-topology_pull.sh
./relay-topology_pull.sh
Restart the node
sudo systemctl restart cardano-node
This can take some time to re-sync check with
./gLiveView.sh
****Security -IMPORTANT
kes.skey
vrf.skey
node.cert
Only these 3 keys and certificate should be present on your Block Producing node. On relay nodes there should be no keys or certificates. Back up any keys and certificates to multiple USB sticks via FileZilla.
CONGRATULATIONS – Your stake Pool is ready to produce blocks!

If you are looking to set up a stake pool and need help setting it up we are offering a Stake Pool Setup Service for 3500 ADA (£900 approx $1100). Please note you will also need to take into consideration monthly server costs and the stake pool registration fees highlighted in this article. Contact us at admin@popupworld.co.uk if interested.
Help support the Pop Up World Blog and entrepreneurs worldwide by joining our Pop Up World Stakepool! Go to https://popupworld.co.uk/popupworldstaking
If you enjoyed this article please remember to like and subscribe for regular entrepreneur news on Pop Up World. Feel free to visit us at https://www.popupworld.co.uk
Thanks!
If running your own stake pool is not your thing you can also earn by staking.
Want to learn how to stake on Cardano? Read this article:

Review. Convincing Crypto – English
It starts with an idea. Pop Up World is a platform that helps start-ups and small businesses reach for the stars. No matter what size you are. Use our start-up guide Business Zero to Superhero, Design your Logo. Connect with investors via our Investor Connector. You can start a Website and Domain name. You can Search for and promote your Premises. You can promote your idea for free on our Pop Up World Ads site, you can even form a Limited Company You can also join us on our journey via the Pop Up World Token (PUW).
Get the token on Cardano Decentralised Exchanges (DeXs), MuesliSwap, SundeSwap, Wingriders and Minswap. Or click the link here:
Pop Up World token has a growing ecosystem and is one to watch for the future.
It starts with an idea. Pop Up World is a platform that helps start-ups and small businesses reach for the stars. No matter what size you are. Use our start-up guide Business Zero to Superhero, Design your Logo. Connect with investors via our Investor Connector. You can start a Website and Domain name. You can Search for and promote your Premises. You can promote your idea for free on our Pop Up World Ads site, you can even form a Limited Company You can also join us on our journey via the Pop Up World Token (PUW).
Review 1. NFTs Guide – English
Review 2. Inside Crypto – Hindi – Urdu
Review 3. Crypto Universe – English
Review 4. Crypto FLO – English
Review 5. Crypto FLO – Portuguese
Review 6. Malik Atif – Hindi -Urdu
The Pop Up World Token is designed specifically for entrepreneurs.
PUWSP Stake Pool
Supporters can also earn rewards by staking in the Pop Up World Stake Pool (PUWSP). Delegators to the pool receive 40% of the rewards should we mint a block. The remaining 60% will be used to support exciting new start-ups and projects on the platform. https://popupworld.co.uk/popupworldstaking

Useful Resources used for this article:
https://developers.cardano.org/docs/stake-pool-course/
https://forum.cardano.org/t/cardano-relay-sync-taking-forever/58624
How to Start a Stake Pool YouTube videos:
https://www.youtube.com/watch?v=XCyH4qkJJdA&t=324s Part 1
https://www.youtube.com/watch?v=hB2KpY26bfg Part 2
